|
Fly of
the Month
Bob Ireton brings together his
experience in fly fishing, aquatic entomology, and knowledge of fly
tying techniques and materials, to design and tie durable and
effective flies.
|
|

Volume 5, Issue 11
November 2004
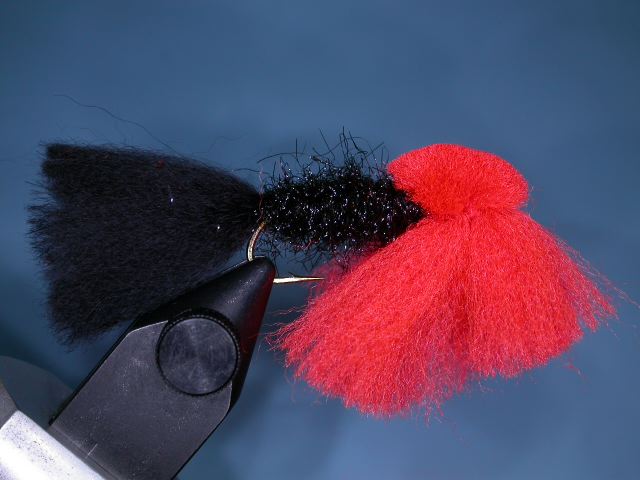
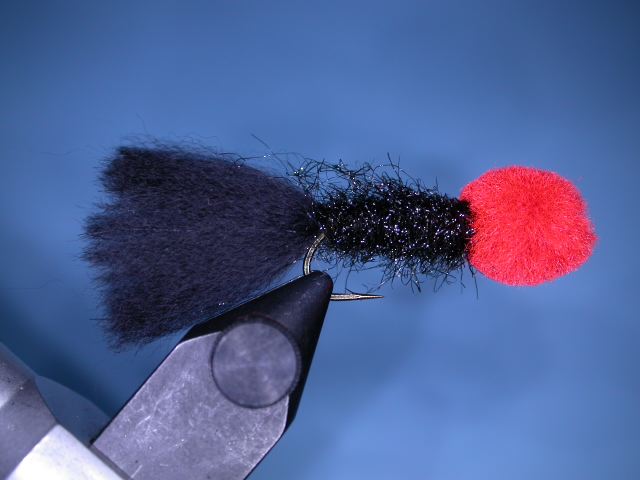
EGG SUCKING LEECH
Fly, Text, and Photography by Bob Ireton
One begins to think about steelhead
fishing as the days shorten, and Fall temperatures start their downward
spiral toward Winter! We are very lucky in Ohio to be near good Lake
Erie and Michigan steelhead waters! One of the best flies for this
species is the egg pattern. It is probably the most successful pattern
for Lake Erie steelhead. Another great all around fly is the woolly
bugger. One variation of the woolly bugger is the leech pattern, another
good steelhead fly. What if we could combine these two great patterns
into one? Would you believe the ‘Egg Sucking Leech’? And it is not for
‘just’ steelhead. Individually, both these patterns have a very nice
catch record for many species of fish. Combined, a deadly combination!
MATERIALS
Hook – Daiichi 1750, Mustad 9674,
Orvis 0167, TMC 9395, or equivalent.
Size – 4-12.
Thread – Black in Uni 3/0 & 6/0, and red in Uni 3/0.
Weight – Lead wire, or equivalent.
Tail – Black arctic fox fur.
Body – Black ice dubbing.
Egg – Red egg yarn.
TYING STEPS - click on
pictures for larger view
|
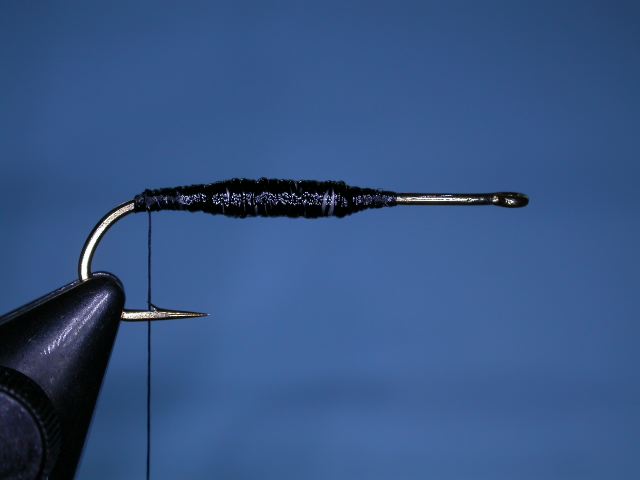
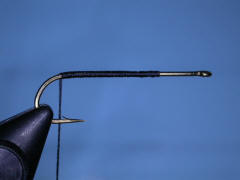
1 – Place
the hook properly in the vice, and crimp down barb, if desired. I am
using a Daiichi 1750, size 8, for this fly. The body of this fly, not
counting the tail, will be 2/3 leech, and 1/3 egg. Attach the 3/0 thread
1/3 shank length behind the eye of the hook, and lay on a tight base
rearward, stopping at the barb. Tie a half hitch if you like. |
 |
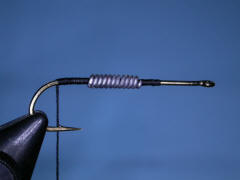
| 2 –
Using lead wire the diameter of the hook, apply the weight. I have
applied a dozen wraps of .025. |
 |
|
3 – Now cover
the lead, and build a ramp of thread on both ends of the lead. The 3/0
thread covers much faster than 6/0. On either end, tie a couple of half
hitches, then a whip finish. Cut off the 3/0 working thread. Cover the
thread with Dave’s Flexament. Now attach the 6/0 working thread above
the barb |
 |
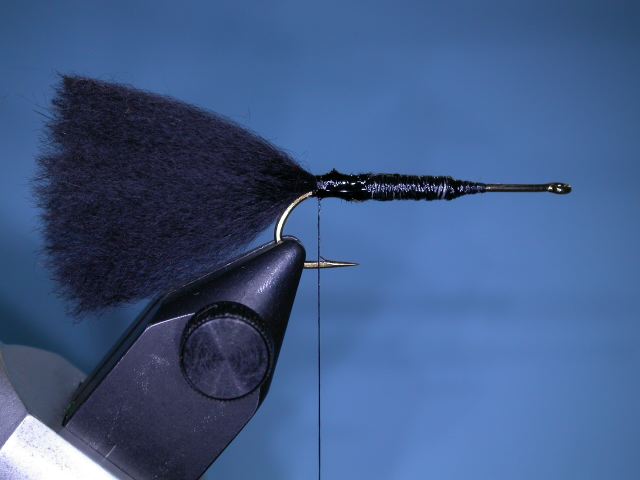
| 4 – Snip a nice bunch
of arctic fox fur, and using the base section, tie in a tail the length
of the hook shank. Snip off the excess, and finish covering the tail tie
in area. Tie a couple of half hitches. Adding some head cement to the
tail tie in thread is a good idea. |
 |
|
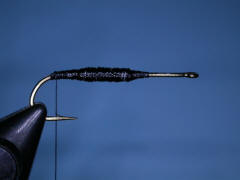
5 – Form a
dubbing loop, and arrange the dubbing evenly in the loop. Bring the
working thread forward, and tie a half hitch |
 |
|
6 – Spin the
dubbing loop to form a nice dubbing rope. Palmer this dubbing rope
forward to form the body. Tie off the rope, and snip off the excess. Tie
several more turns of thread, then a couple of half hitches. Tie a whip
finish, and snip off the working thread. Put some head cement on the
thread wraps.
|
 |
|
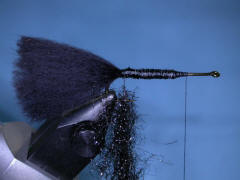
7 – Attach the
red 3/0 working thread, and make a base the length of 1/3 hook shank
length. A pair of dividers is helpful for this. If the black thread
inched over onto the ‘egg’ portion, just cover it with the red thread.
This isn’t a problem, as the egg will cover this. Leave the red thread
in the center of the red base, and tie a half hitch. Put some head
cement on the red thread. |
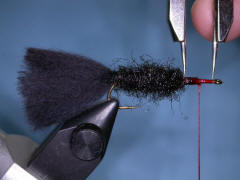 |
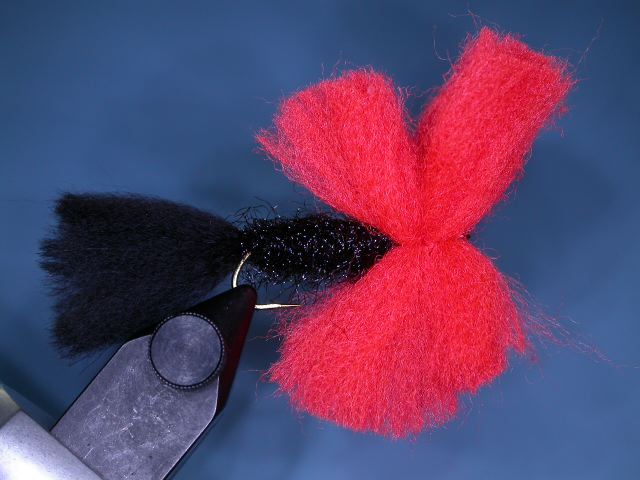
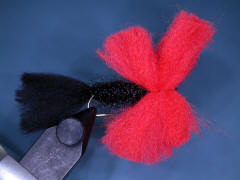
| 8 – Cut 1-2 pieces of
red egg yarn, 1” long each. Place on top of the fly, and palmer the
thread up and over the mid section of the yarn. As you start the second
turn, let loose of the yarn, and let it roll over to the bottom of the
fly as you tighten up the thread. Do another tight wrap with the thread. |
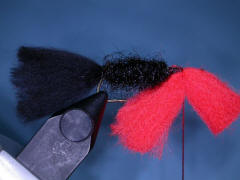 |
| 9 – Cut 2-3 more
pieces of egg yarn, 1” each piece. Place this on top of the fly, and
attach with several tight wraps of thread. Bring the thread in front of
the yarn, and tie several half hitches. If you can, do a whip finish.
Snip off the working thread. Put some head cement on the thread. Note:
More pieces of yarn make a denser egg. |
 |
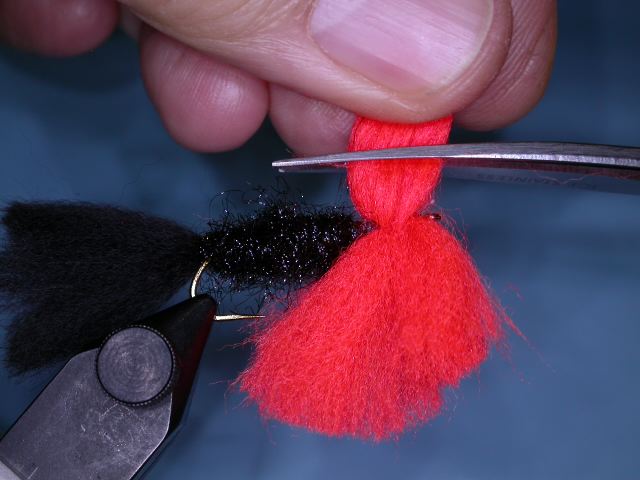
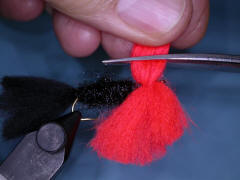
| 10 – When cutting the
yarn, the closer to the base you cut, the denser the egg will be. If you
have curved blade scissors, this is one of those times to use them.
Tightly hold the yarn on the upper side of the fly, and while
maintaining an upward pull, snip off the yarn. |
 |
| 11 – This is what it
will look like. Then rotate the fly to bring the underside of the fly in
the upright position. Grasp the yarn as before. |
 |
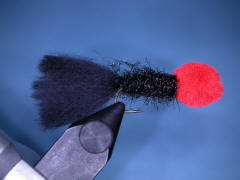
| 12 – As in the top
yarn, snip off the yarn for the bottom of the fly the same height as
before. Even up the egg shape with the scissors, and tease the yarn so
it of even density. |
 |
© 2004 Robert R. Ireton, II
www.buckeyeflyfishers.com
Site designed and maintained by
Panfalone@fuse.net
|